%20%3B3.png)
Female Mesh Completed
- taminaionanimation
- Sep 20, 2020
- 6 min read
Following on from the last post I have made massive progress towards completing this project however there are a few things I got hung up on or was not able to complete mostly due to lack of knowledge in the subject area but they where the most advanced things anyway and one of those things required a certain partial knowledge of programming.
Before I start all my writing I'd like to thank Royal Skies LLC who you can find on YouTube for all the videos he has on Rigging, Weight paints, Drivers Etc as they are what I have been using to try and understand it all and they have been a massive help and in my last few posts I have mentioned his channel but not thanked him so :3 thank you
Okey lets start off where the last post ended which was just before starting retopology it was actually quite easy especially because my mesh does not have any face so I dont have that complication I actually retopologized it quite quickly starting from the head and working my way down following the FlippedNormals tutorial on basic retopology and the tools to do so are quite quick and amazing so within around an hour I had already got down to the pelvis and making the breast topology as actually quite easy although I had to go back to sculpt mode to add in a quick Nipple so I had an end point for my breast topology.


I was actually quite shocked how quick and easy it was to retopo everything aside from the hands and feet which I would do later and spend more time on but the new mesh was not perfect by no means as I had to tweak alot of areas later especially that terrible pelvis area where the legs connect but I was quite happy since this was by far the best mesh I have made up till now and I've only made a few up till now so I'm quite proud despite the look ;3


Next was retopoing and connecting the hand and feet to the mesh now this was not easy especially the hand which Is the only one I will show you as the feet where not as hard even if it has 1 triangle in it.
now you must understand that I made the hand separate from the body since I did not sculpt hands and had to poly model them using a reference and once I had modelled the hand and it came time to connect it to the body there where 20 verts in the hand and only 13 in the arm so I had to work some magic to keep it in quads and connect it which was the hard part since I could only cut it down to 12 verts neatly so I still ended up with 1 triangle which I moved towards the thumb so it would not cause any major deformation.


But there where more triangles in the hand however these where good ones used correctly to get better movement in the knuckles or that's what I think they are there for anyway I'm still unsure.

Before I created my own rig I wanted to test something that may help when it comes to animation which was to add triangles in the knee to see if it would give better deformation so to test all of this I used Mixamo's auto rigger and animation library.
I used 2 animations from Mixamo one was a rumba dance and the other a Naruto type run and I layed out all the videos the same on the left is the unedited mesh and the right is the mesh with the triangles in the knee and to be honest there was not a massive difference between the two. (also ignore the elbows I placed them wrong)
I leaned that while in rendered view and u play an animation instead of it moving the physical mesh it moves the wireframe like this so you can still see the animation in quick time. (Nothing relevant to the project just thought it was cool)


I'm not 100% sure why I took this screenshot or why I numbered them I totally forgot but I think it was just me testing the basic rig with auto weights same goes for the rendered versions below this as well.


The next thing I tried is probably one of the most important when it comes to a female character/mesh since its only realistic to have it which is to add in jiggle physics and the addon I used to achieve it was springbones however before I even tried to do that I needed to tweak the breasts Weight painting so that it only effected the breast area as you can see.


However this was not the best I mean it did work but I tweaked it again later to be less red (1.0 Weight) and be more yellow-green (0.7-0.5 Weight)


once I had the weight paints in I did a quick test of the spring bones to see them in action using the default settings which looked awesome and then I tried to render it.
As you can see that did not go well as the breasts ended up being sucked into the body and it took me like 20 minutes to figure out that you have to BAKE the animation before rendering which I had 0 clue about so I learned something :3 and in the end I rendered it out.


The next thing I tested was something called Pixar topology and I can see why its used but I have no idea why it didn't work for me its most likely the weight painting which still puzzles me but I mean I did try everything I could think of to get it to deform better but I eventually just scrapped it although I think I still added it to the elbow cause I forgot to remove it.


As you can see I color coded the Pixar topology in pink it deforms a little but not the way it should so I just scrapped it all so I think ill just leave this section as is and not explain more.


I tried my hand at making hair using curves thanks to YanSculpts tutorial on YouTube however I did not make it look good I was just testing it and when it came time to make it move with the head I was puzzled so I just connected it to the body mesh in the end.


Right so here is where its all going to get confusing and complicated or at least for me its all confusing and complicated because its all about expanding on the basic rig with correction bones, drivers, custom bones and new Ik's but I'm going to simplify it all as much as I can for my own sake.
Right lets start with the hand as you can see something clearly is not right I mean its obvious but let me tell you why the hand has a correction bone (The Green One) and its to make the deformation of the hand when it moves left and right as well as up and down better using Drivers however the left and right worked but the up and down did this to my forearm and I did try fixing it but Tbh I did not understand it enough.

The next thing I want to mention was actually easy to understand and that was making a custom bone controller for the head tracking so wherever I move the large blue pointer the head will look which is nice ;3


I tried for the life of me to get the two correction bones for the hips working but as you can see they just wont work and this screenshot was actually the best I had gotten the correction bones you dont want to see the worst trust me.

Lets talk about the giant blue arrow this arrow controls the chest and stomach area independently from the hips which is the large blue circle which helps quite alot.

Before I talk about the last thing I want to show you my rig as a whole the left side of the bodys controllers/bones where coloured in red and the right side green where as anything that was not left or right where coloured in blue also the giant black rings is the master controller than moved everything at once.

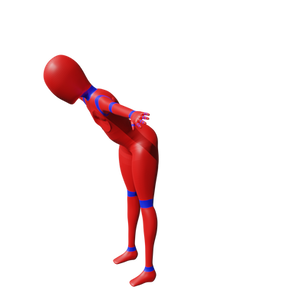
The last thing is something that I am going to change since its not working as it should and that is that I added in a new Leg IK that has a toe pivot controller built in the green triangle is the pivot and as you can clearly see its causing a massive deformation when i move the leg IK and I tried to fix it damn I Try alot of things to no avail but anyway I carnt fix it with my meagre knowledge so Ill go back to a normal leg IK instead


And I think thats everything up till now after I fix the leg Ik I will do my animation challenges that I set myself and I think I will also try the same challanges with the Royal Skies LLC Female Mesh/Rig and put them side by side to see the diffrances.


Comments